Showing posts with label Ali Edwards. Show all posts

5.05.2015

Hello Again

Just a quick update to say hello…again! If you have stayed with me this long, I want to say thank you!

Life in 2015 has been anything but smooth. I knew it was going to be a bumpy ride, but I had hoped to be able to keep up with things better. But, some things including this blog had to go on the back burner for a while.

But hopefully that is behind me. Decisions have been made. Life goes on. And happy to say we are in a new space! Out of the apartment and into a really really real house! can't tell you how awesome it is to see how much Maggie loves it--especially the backyard. One of the things I'm working on is making this place our own and embracing being where we are. Grow where you are planted, right?

My plan is to start sharing some of the project life layouts I've made with the Project Life™ app. I'm in the process of getting those off my phone and into my album using Persnickety Prints. I had some layouts printed with them and have always been very happy with their quality. Plus I was able to visit their store this spring and got to see first hand their "persnickety process!"

Currently I have project life layouts finished through Week 7 as well as other layouts  and the 15 on the 15th project. See below for one of layouts I created on my phone.

Other things I've been up to (besides work):

I've also been working on layouts for my 6x8 personal album as well as various other layouts. I am subscribing to Ali Edwards Story Kits and Stamps and I love love love them! The education and inspiration plus the products are so worth it! I'm still working on getting going on actually making things.

And last month I started subscribing again to Studio Calico. This time to the scrapbook subscription. I had subscribed to the Project Life™ kit since the beginning but last December I cancelled it because I knew the first half of this year was looking to be tough. And honestly I just needed a change. With the recent move I saw how much stuff I had collected and went through a big purge. Since I'm wanting to create more layouts I decided to subscribe to the scrapbook kit and plan to purchase some Project Life kits when I want to. I've been purchasing the digital cards each month so I still get my fix that way for right now. And I can use those in the app! So it's a win.

Hoping to share more about my 15 on the 15th project soon too. I've really liked this project although in April I was away on business and am going to be "flexible" on the actual date to make April work.

So here's a look at one of the layouts I created on my phone using the Project Life™ app and Letterglow. These are cards from the Dazzle and Love Story editions in the app and Ali Edwards digital cards: Simple Lines 3x4 cards. Love that set.

This is a simple two page spread showing my daughter in her new room. She loves her new loft bed from IKEA. And yes, those boxes in the corner are still there…work in progress, work in progress. Big sigh. But she loves her room and it will get there in time. It's all good.


I've had quite a few questions about using Letterglow and am planning on making a video once the update is live. There will be fewer work-arounds and app-smashing together. It's going to be awesome!


So that's where I am right now! Considering upgrading to a new site but everything is a work in progress, right? 

Thanks for sticking around and for your support! Hope to be back soon!


2.02.2015

Project Life Hybrid Introduction Page

One of the things I like to do is have an intro page each year. In past years I have documented the details: where we live, what cars we drive, etc. Just the basic facts. I like having that record.

This year I wanted to do something more that still shared the state of where we are, but not specifics. We have worked hard these past five years getting my husband through school but now we are faced with some more decisions about our future. Working out the details and taking new leaps (for me) are challenging. I am a big believer in going for our dreams. Really, I am. But I'm no longer a 20 something college student. I have a family to support and those dreams sometimes take a side seat. But, new opportunities may exist and I hope to be open to them.

The thing is, I hope that no matter where we are location-wise that we embrace this idea: "life is full of adventure" and that we make lots of fun traditions and celebrate life.

So when I was looking at the word art package "Messy Daily Circles" from Ali Edwards, I knew I wanted to do a big page and focus on that "life is full of adventure" word art. (This was an assignment for the Digital Creative Team for Ali Edwards--for which I am super thankful and excited to be a part of.)

This two page spread is a pocket page on the left (the back of the title page) and then something for the back of the beginning of my weekly digital pages (from the Project Life app.) I went with a super simple enlargement mounted on white cardstock.


A closer look at the word art from the Messy Daily Circles word art set from Ali Edwards. I used the circles as they are on two of the photos. On the "hello awesome life" photo I traced around just the words and then copied/pasted those directly onto the photo. It worked great! Really fun and I love that this page just screams "embrace the awesome!"


The cards "on beginning" and "Hello new beginning" and "completely new direction" are from Ali Edwards Story Kit from the Firsts prompt. (if you subscribe to both the stamps and the kit so you get the digital set as well. I don't think these are available right now but please direct any questions directly to Ali's site to get the best information.)


Another look at the "hello awesome life" word art. The Observations chipboard and the "Life is good" chipboard pieces are from Ali's Week in the Life kit (currently available as of this post.) The awesome "start fresh" card is an old one from Lindsay Letters (from a Studio Calico Project Life kit.)


The word strip stickers are from Ali's Firsts Story kit. That cute hello stamp is from my friend and fellow Austinite Molly Frances. The yes wood veneer was from the Ashley Goldberg class at Studio Calico. I like that I just used it instead of keeping it for "that perfect" page. I sometimes hoard too much and using this plus the awesome Lindsay Letters card was an attempt to get over that perfectionism and just have fun with the products. And I love how they turned out.


And here is the full page 12x12 traditional layout. Super simple and fun. I printed it at 8.5x8.5 because that's the size of my printer. Initially I thought I would do a full 12x12 but that would entail waiting for said enlargement to come in the mail or piecing it together. I am always looking for ways to add white space in these albums and so just putting it on a 12x12 piece of white cardstock worked great!

I added the "Life is Full of Adventure" and the text directly onto the photo (print a test run first to ensure placing.) Then I added the chipboard "Life begins at the end of your comfort zone" and the "yes" burst (both from the Firsts story kit.) Simple. Fun. And DONE!


So there it is! A fun little introduction page setting up a theme for this year, giving a peek into where we are right now and the decisions we are making. And it makes me realize I want more of this: more big photos, more playing with the mix of digital and physical products. And more of the simple, do what works for me type of things. I can be working on a page like this and tinker around with things while cranking out a month of PL on the PL app. It's all good.

I'm also working on some tutorials to show more about Mobile Memory Keeping with the Project Life App, Letterglow, Collect and other apps I use. Is there something you would like to see? I have been wanting to work out my own workflow before I shared but I think I am ready to show some tips and techniques.

Thanks for stopping by! Hope you have a great week!


1.21.2015

Hello Project Life and Memory Keeping Plans for 2015

Hello twenty fifteen! I'm finally getting to the big "how I'm approaching Project Life this year" post. 

The truth is, I'm still tinkering and playing around but I'm confident enough now to say "this is it!" (at least for now) :)

The thing is, I've been doing Project Life or some version of it since around 2009 I think. And no, I haven't technically "finished" an album. But I have created many many pages and I have even been able to teach a few classes to share my different tips and approaches and encourage others to embrace where they are and take steps to tweak their own process. For which I am incredibly thankful. 

If you have read my recent posts or seen on Instagram, I am currently having fun playing with the Project Life App and my plan is to continue using the app for my main two page (left side + right side) layout each week. Yes, I'm tacking it weekly this year! Kinda digging that! (I can still imagine I will be flexible in my weeks if needed but I'm excited for the very simplified parameters this year.) 

My goals for Project Life:
  • Weekly left + right side spreads using the Project Life App
  • Print these at Persnickety Prints at 12x12
  • Add to my 12x12 Project Life album (the one I am using is from Becky Higgins found here.)
  • Sprinkle in other pocket pages and inserts as I have time / inspiration / motivation / space to do so
  • Keep it simple but still add elements such as Ali Edwards word art. I just love those little touches.
  • Enjoy more layouts finished and in an album and have fewer gaps this year. Look at Project Life more as just another album and not as an "epic end of all albums"; be okay with not including everything. Keep it light and simple. Use those photos and snippets of stories to spark longer stories and pages (which I add here or to other albums.)
  • Hopefully have more time to work on filling in some gaps and finishing Week in the Life and December Daily projects of years past.
Additional projects:
  • Day in the Life | 15 on the 15th: Each month on the 15th I am going to do the Day in the Life project with a goal of having at least 15 photos I love that capture our everyday life. I will use primarily the big camera on this day so sharing these pages may take me longer. I'm okay with that. My main goal is to practice with my big camera. I really want to get a wide angle lens this year. My kit lens died and so I shoot right now at around 75mm (with my crop sensor and 50mm lens.) We'll see. Here's to hoping, right? If not, I will try to rent one at least once or twice this year. I plan on creating an insert or additional page with these in my album and at the end of the year have them made into a photo book.
  • One Little Word: I am taking Ali Edwards's class on her blog. It is so great. This year my goal is to participate more with the prompts. Last year my word was with me all year and definitely helped me, but this year I want to be more intentional with it. I think I will need the reminders this year more. (I hope to get a blog post up soon about it.)
  • Week in the Life: will probably tackle this again if Ali does. I always love joining in. Finishing it is another story. Like I mentioned above, I hope to find more time to finish up my past projects.
  • December Daily: can't help myself. I love it but every year my work seems to get crazy busy around this time. It's all I can do to live life during the month. But December Daily helps me to take time to capture things and live intentionally to create more memories. I love that project.
  • Ali Edwards Story Kit / Stamps: So far I've been getting some great products and listened / watched a lot of inspirational content from Ali. I may make a goal of one layout a month, but as I look at everything I am hoping to do, reality is I am just going to enjoy getting them and using them here and there. If I do more then great. If not, no guilt because I really enjoy them and the content is wonderful. Who knows, maybe I'll get really inspired and do a bunch! I will add those to either Project Life or my Library of Memories albums. And I want to get my story journal going again. At least capture some ideas of layouts / stories I want t do.
Okay, just listing these took forever! Reality is…just enjoy life and do what I'm inspired to do!! Lighten up and live life with a light heart. Look for the good and enjoy it. That's my main goal this year.

And you thought I was joking when I said I just wanted to stop all my other projects and follow along with Ali! Seriously though, I am a huge fan of her life documentation processes and projects and feel very inspired when I follow along with her. And I am incredibly thankful to be on her Digital Creative Team this year. I'm excited to share how I use some of her products in my own projects.

So here we go!

Project Life 2015 Title Page

So I thought I would share my title page for 2015 Project Life and my week 1 spread to give more of an idea of my approach. This is a paper pocket page + overlay. On the back I will do an "about us" page -- left side pocket style and either an enlargement or a PL app page on the right.

The nice thing about the app: more time to play around with other pages and techniques!! Like breaking out the Silhouette Cameo to play with some Ali Edwards word art. Gold foil + Ali art = awesome. It took me a bit to remember how to use it, but once I found a few tutorials online I was good to go. I love these.

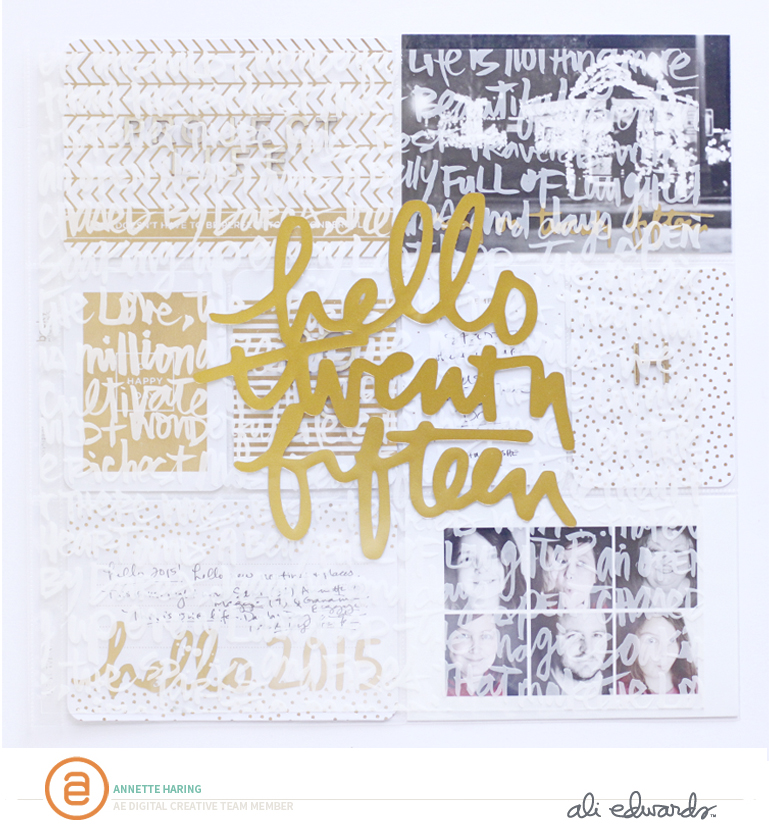
For my title page, I cut the "Hello Twenty Twelve" from the gold Silhouette foil sticker paper. It has adhesive on the back so you can just apply it to whatever. I used a 12x12 transparency / overlay from Studio Calico as a cover page over the title page. Love the see through effect. I simply lined up the transparency and cut holes using my Crop a Dile punch. I do two holes for each one to help it turn smoother.

These are from the Twenty Twelve set from Ali Edwards


It's kind of hard to see the transparency but I really love it. You can find it here (if it is in stock.)


And next here is my title page. Again, while I had the Silhouette out and cutting I added quite a few elements to be cut. I cut the "bring on twenty fifteen" and "hello 2015" as well as some other things from the same paper.

One thing for sure: I will definitely know which year this album is for! :)

I love repetition so it works for me. I used a bunch of gold foil cards from different Becky Higgins Project Life kits. (I picked up a bunch from her site on sale and quickly added a few favorites to my title page. So creating it didn't take "too" long. :)

I added some wood veneer elements to calm down the gold a bit. I like the neutral color and texture it adds. And I added a favorite photo from the holidays of me and Mags in bokeh lights. My word this year is "light" so it's a wonderful symbol and reminder for me.

I also saw another Project Lifer have some really fun family photos on her title page. I tried but..well at least I have a few silly ones. Trying to lighten up. Maybe I will add more of those silly ones on the next page.


Close up of the "bring on twenty fifteen" from Ali's set.

A close up of the wood veneer / gold foil card. I need that quote on my wall I love it so much.


And while I was playing around with the Silhouette I cut one of the boxes from Ali's set and added it to the page lifter. I really like it here. Similar to how Pam Baldwin used boxes from another to create dividers. This would be really fun if there were monthly boxes to cut and use on dividers for each month. 


Project Life Week 1

And here is a look at my Week 1!  This was created in the Project Life App + other apps. All of it was created on the phone  utilizing Dropbox and apps such as Collect and Letterglow. I am planning a bigger how to post to get into some details on this approach. So far I love it. I was already doing a lot of my creating the photos and journaling in Collect and now it allows me to just take it another step further to create pages. 

It does take longer to add elements like Ali's word art. The simplest way to use the app is just simply use the cards in the app. I have done that and I really like those pages too! There is nothing wrong with keeping it simple. 

And another tip is to keep decisions simple by repeating elements. I debated keeping a very simple title card this year and was going to make my own. Then I found this great set from Little Lamm Co. Her brush script is right on with the Oh Snap Boutique calendar cards (which I bought on an 80% off sale and tweaked to 3x4) I'm using this year so it was a no brainer! I love that another decision is just done!! (again, I can still use other title cards with my inserts, etc.)

The word art set I used for these pages is from the Enough set. Such a versatile set. I really loved just adding the word art right on my photos and journaling cards to enhance the storytelling about our first week. I couldn't help but keep adding more because I felt they really captured what what going on right now. A lot of clearing out / making space / embracing enough. 

The everyday love 3x4 card is from Ali's Everyday Stories set. I had created a background paper from some of the words and used them in a 6x8 layout for Week in the Life (blogged about it here.) So while I was creating the 6x8 I also had created a 3x4 card and had saved it in Dropbox for use on a future layout. 


Here is the right side of week 1. I continued to use the Enough set over my photos and filler cards. I also added "monthly goals" from the Hello Goals set from Ali. And the Jan 2015 is from Ali's Hello Life Boxes 2015. I love mixing her word art from different sets.

The week in review 4x6 was created by saving one of the Project Life cards from the app to my camera roll and then created the text and number in the app Letterglow. More on that process to come. I see a return of Mobile Memory Keeping Mondays as a goal for my blogging this year. I have saved that as a template so I can just tweak it each week. Seriously that is one powerful little app.

And there it is! My big plans for a big year! Let's see if I can fill up this album!!


If you are looking for more inspiration on Project Life or pocket scrapbooking, I highly recommend checking out "Pocket Your Year" by Megan Anderson. I was lucky enough to teach past Project Life classes at Big Picture Classes with Megan and I know she is a wonderful teacher. I always learn from her and she helps me focus and get things going. Check it out if you are interested! It's awesome that it is a year long class!


Project Life is a simplified form of scrapbooking / memory keeping created by Becky Higgins. You can get more information on the products and process here

Silhouette products used (affiliate links)


12.08.2014

Hello Project Life App!

Hello again! Back again sharing a few more things I've been playing around with. 

You may have heard of it. 

It's the Project Life App from Becky Higgins and team. And it's pretty awesome. 

I had a chance to be a part of the beta testing and was able to use it to get a month of 2013 layouts and more done with it for the class. One of the things I tried to do was to use it to "keep up while catching up" and it worked pretty well. I think for most normal weeks it works well for me.

In fact, during class one of the students and I made a challenge to work on that week with the app and see how it went. So I did that and thought it was pretty awesome. And so I did the following week as well. I'll share the other one soon. 

So here is week 47. I've never been one to try to number my weeks because I wanted the flexibility to change things up. But…if this works for me, I might try it! It's kind of fun! 

Have no idea what week it is? I usually google it. I've found a site here that tells you what week of the year it is. Kinda cool. 

Here is the full two page spread. I created a 24x12 canvas in PSE to put the two together after they were created. I just really like seeing the full two page spread together. It helps me to see the layout as a whole and creates more cohesion for me. Plus, I like to share it this way too.

I did the creation of this all on my iPhone.


To begin with, I used my favorite Collect Photo App to collect the photos and stories. Then I exported and saved them to my camera roll at the 3x4 size. I chose not to add the print bleed since I was just dropping them into the app and I think they worked well.

For a video tutorial on how to export, click here. Note, the latest version is slightly different, but still similar enough. I plan to do a new tutorial this coming year on my process (once I get it worked out.)


Here is the left side. I used the Midnight edition in the app for the title and week in review card. 

Then the "This is Daily Life" word art is from Ali Edwards. From the "Wash Your Hands" set. 

To create that, I used the another app from the creator of Collect called Letterglow. It works great and lets you import .png files (for word art.) Hello awesome! I also plan to do a tutorial for this sometime too. (note that you can use .png files in the PL app if they are already sized correctly -- for instance Ali's fall cards worked great. I will share that in another post.)

Basically, in the Project Life app,  I created a collage with the 2 on a  4x6 and added the kraft paper card and the heart card and then exported and saved to my camera roll.

Then brought them into Letterglow to play around with adding word art and type on the cards.


And for the right side:

For this page I added IKEA RUN and the Everyday Love in Letterglow (to the cards I had exported from the app. I also had to crop each to 3x4 in PicTapGo to make it work like I wanted. See--still working out my process.)

Then I just saved them and then added them back to the app. Yes, it would be awesome if we didn't have to toggle back and forth. But seriously, this is just such a huge step forward for mobile memory keeping! I hope it will come with later versions. But for now, this works pretty well for me.

Also note there are lots of other apps that let you add text to photos and use .png files. This is just one I'm familiar with and the easiest for me to use at this time.

And here's a close up of my week in review and the Ali Edwards word art. And if you look closely at the photo on the bottom right above: the Thanksgiving preparation one: see if you can find the giant balloon that was in our house for over a month. My niece and nephew got a kick out of it too.


The result? I pretty much love it. I can tinker around a bit on my lunch break or before bed. I'm still in tinker mode. Meaning, I'm just playing around with it to see how to make it work best for me. (note I may have nothing done in my December Daily but I pretty much have four pages done already in the app for December! More on that to come.)

My plan for Project Life in 2015 is going to be to use this for my base spreads. I will use a D-ring 12x12 binder. I just picked up two of these from Becky's site during the cyber Monday sale. That way I can still add in physical pocket pages as well. At least for the first part of 2015 that is the plan. The idea is that I will use the extra time I save (hopefully) to catch up on some old projects and maybe, just maybe finish up my Week in the Life and December Daily projects.

So here is a look at how I'm beginning to use the Project Life App. I'll be back to share more. And it includes more Design A and other styles. The fun thing about the app: no worries about what goes on the backside! You can just create for the photos you have! Pretty cool.

I think I like it.

12.05.2014

a few layouts to share | Ali Edwards Digital Creative Team

I'm excited to share with you a few layouts I have recently created for the Ali Edwards Digital Creative Team. I know, I know. Still pinching myself! I just love her products and they work so great with the stories I want to tell.

First up: Everyday Love

This is a two page layout in my 2014 Week in the Life. The pages are 6x8 in size each. The beautiful words from Ali's Stories of Life set just jumped out at me so I created a background patterned paper from two of the words and then repeated that "everyday love" at the bottom of the right hand side. I also just used the one "story" at the top of the second page which created a nice visual triangle there. I can't tell you how much I love script + type + photos. I added a simple chipboard circle that I had painted gold and a silver glitter letter sticker. Love this layout.


Next up: Jingle All the Way

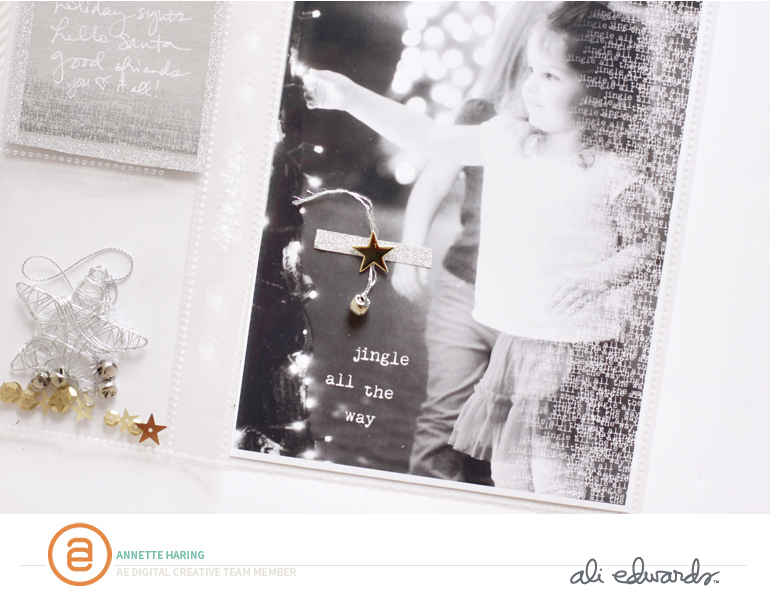
This is a two page (6x8 size) layout from my 2012 December Daily / Bucket List album. I posted this one on Instagram and commented about the upside of taking a long time to finish projects is that new fun products come out that can spark you to finish a page. It's another way of looking at being content with where you are in your process. 

The set I used here is the Merry and Bright Text Overlays. Oh, how I adore overlays! These are so fun because they add a softness at the edge that is so cool. I just added the .png file right over the photo and turned it white. 

For the title I cut out the original words, enlarged them and added them to their own layers to make "Jingle All the Way" stand out a little more as the title.

And it's hard to see, but I also used "holiday delights" on the grey card with white handwriting to list all the delights of the night. Also, at the bottom of Ali's "remember this moment" card, I printed just the "merry & bright" words from that file. 

To print onto regular journaling cards, I created a new 3x4 file in PSE and added the overlay, printed it on white copy paper, then taped the card onto the paper and ran it through the printer again. It worked great! Only I had taped along the bottom of that grey one, so there was empty space when I removed the tape. No worries! I just started adding silver washi and then it just kept going! So I ended up lining both cards with silver washi tape. Fun way to make mistakes work in your favor! Just cover them up! 

Anyways, I adore this page as I've been wanting to use jingle bells for quite some time and finally made it happen! I picked these up at my local craft store and had to use metallic thread instead of twine because the bell is quite tiny (I didn't want to add too much bulk.) I added some gold chipboard to play off the sequins I added to the confetti / star pocket. It's attached with a glue dot and redline tape on the outside of the page protector. I may stitch it down too once I have the backside finished. 


Was hoping to add more detail shots, but I figured something is better than nothing! And again, I just loved working with these products and really love being able to finish up some pages in my projects.


10.08.2014

Exciting News about Ali Edwards Digital Creative Team!

I'm so excited to share I am part of the new digital creative team for Ali Edwards! If you haven't heard about Ali, please RUN and check out her new site here!


I have been using Ali's products for a long time and basically learned how to use digital products from her and Cathy Zielske. I am a huge fan of both of them. 

When Ali launched her new site this August, to say I was excited was an understatement. I was working hard on all my own new class content and yet a part of me just wanted to delete the blog, delete everything and just be inspired by her and go tell stories with photos and words. Seriously! I was like, this is it! I could just quit everything I am doing and go tell stories and be happy. 

And I'm really glad I didn't quit. Thankful I pushed through and am really happy with the opportunity to continue to learn and grow and also to help others. And I'm so so excited to be able to use Ali's products to help me tell my stories. 

If you are interested in learning more about Ali's digital products, click here. There is a good mix of products including word art, templates and printable cards. Lots of options for telling stories regardless of whether you are paper based or fully digital or a mix of both. I also subscribe to her Story Stamp club because I use traditional stamps as well. 

Things you will likely see from me: a mix of it all! I love it all and can't help it! I use Ali's word art directly on photos before printing. I use her templates in my Week in the Life and December Daily. I also like making my own filler cards and journaling cards for Project Life with her supplies. I will have Project Life layouts as well as some more traditional ones and enlarged photos. I may even get the Sihouette working again! The cool thing is there are so many options and many ways to learn and grow as well. Can you tell I'm excited?!

Here are a few samples from me. Here I used one of her overlays from Designer Digitals to create a title card in my January 2014 Project Life. Her set is called Hello Life 12x12 Text Overlays. You can find that here.


Currently I have finishing up my December Daily on the brain since Ali introduced the preorder for this year's kit. 

Here is a look at how I use her templates as an overlay over the photos as well as printed the smaller 3x4 card out and just printed and used it in the album. You can find those at Designer Digitals here and here.


You can also see in my sneaks for  Catch Up with Project Life  how I used her December Daily 3x4 Journal Cards in my 2012 December Daily in Project Life. (available at Designer Digitals.) To find out more about that class and see those sneaks click here.

And seriously, the list could go on. I am thankful for all I have learned from Ali over the years and all I will continue to learn! I'm very thankful also for a good friend who encouraged me to apply. thank you!

And lastly, I will share a story that's still kind of raw and near to my heart. Putting together class content isn't easy for me. I always try to do too much and making it work + balancing family, work, etc almost got the better of me this round. Found myself on the floor for a few hours one day wondering how I would do it all. Wondering if I should just call it quits, etc. Somehow I found the strength to be brave and found the peace that it would all work out. Am very thankful for that moment. So when I saw Ali's Be Brave word art, I knew I wanted to capture that moment in a layout. Here is the digital version. I think I may print this out and add something, or I may not. We'll see.


Again, I'm so excited to be a part of this and very thankful for your encouragement and support as well!

So let's do this! #craftthestory