
I'm excited to share with you a few layouts I have recently created for the Ali Edwards Digital Creative Team. I know, I know. Still pinching myself! I just love her products and they work so great with the stories I want to tell.
First up: Everyday Love
This is a two page layout in my 2014 Week in the Life. The pages are 6x8 in size each. The beautiful words from Ali's Stories of Life set just jumped out at me so I created a background patterned paper from two of the words and then repeated that "everyday love" at the bottom of the right hand side. I also just used the one "story" at the top of the second page which created a nice visual triangle there. I can't tell you how much I love script + type + photos. I added a simple chipboard circle that I had painted gold and a silver glitter letter sticker. Love this layout.


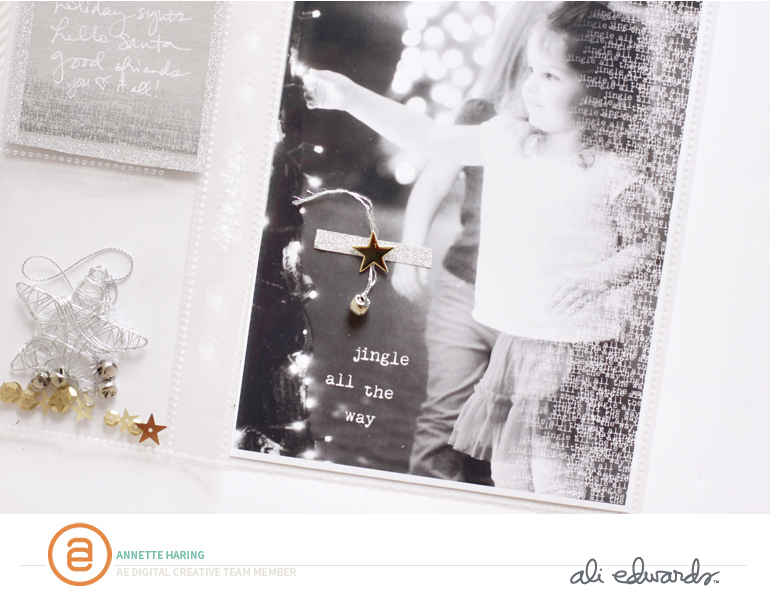
Next up: Jingle All the Way
This is a two page (6x8 size) layout from my 2012 December Daily / Bucket List album. I posted this one on Instagram and commented about the upside of taking a long time to finish projects is that new fun products come out that can spark you to finish a page. It's another way of looking at being content with where you are in your process.
The set I used here is the Merry and Bright Text Overlays. Oh, how I adore overlays! These are so fun because they add a softness at the edge that is so cool. I just added the .png file right over the photo and turned it white.
For the title I cut out the original words, enlarged them and added them to their own layers to make "Jingle All the Way" stand out a little more as the title.
And it's hard to see, but I also used "holiday delights" on the grey card with white handwriting to list all the delights of the night. Also, at the bottom of Ali's "remember this moment" card, I printed just the "merry & bright" words from that file.
To print onto regular journaling cards, I created a new 3x4 file in PSE and added the overlay, printed it on white copy paper, then taped the card onto the paper and ran it through the printer again. It worked great! Only I had taped along the bottom of that grey one, so there was empty space when I removed the tape. No worries! I just started adding silver washi and then it just kept going! So I ended up lining both cards with silver washi tape. Fun way to make mistakes work in your favor! Just cover them up!
Anyways, I adore this page as I've been wanting to use jingle bells for quite some time and finally made it happen! I picked these up at my local craft store and had to use metallic thread instead of twine because the bell is quite tiny (I didn't want to add too much bulk.) I added some gold chipboard to play off the sequins I added to the confetti / star pocket. It's attached with a glue dot and redline tape on the outside of the page protector. I may stitch it down too once I have the backside finished.

Was hoping to add more detail shots, but I figured something is better than nothing! And again, I just loved working with these products and really love being able to finish up some pages in my projects.
Hello Annette,
ReplyDeleteI love the layouts that you shared! I am trying to decide how I want to add a text overlay to some pictures I am printing for my December Daily album. You did yours in PSE?
Love,
Jenn
Hi Jenn! Thanks!! Yes, I do mine in PSE version 10. I just drag the .png file onto the photo and play around with resizing it where I want it. Here is a video from Ali working with 3x4 layered cards that might help. I know she has others too. And Cathy Z makes great videos too! Hope that helps!
Deletehttps://aliedwards.com/2014/02/video-tutorial-working-with-the-3x4-layered-sentiments