3.31.2014

Project Life® 2014 | Week 5

Hello week 5. Still loving this plan. Still just using the recipe of Collect App photos for my main left and right spread + inserts when I want or need them. This week needed only one small insert for our weekend adventures. 


Also kept the color scheme primarily the same with the main spread and the insert. Focusing on the minty green + gold along with a dark grey and black for contrast. Still loving the gold labels along with the gold hearts from Studio Calico. I am still subbing to their Project Life® kit and I really love it for the most part. Some cards are just not my style, but they usually have a grid card on the back of some that makes it work. Plus, with no more Archiver's close by, I need my fix somehow! Speaking of product accumulation, that's a story for another post, but you will be proud of me. I decided in March that I needed a break from the buying phase. So I did really really good and have only gotten the PL kit for the past two months. And I didn't buy anything else in March (I think!) I really did try to follow my spending freeze, although the new releases, etc made it really hard. In the end it was really good and helped in the midst of a crazy month.

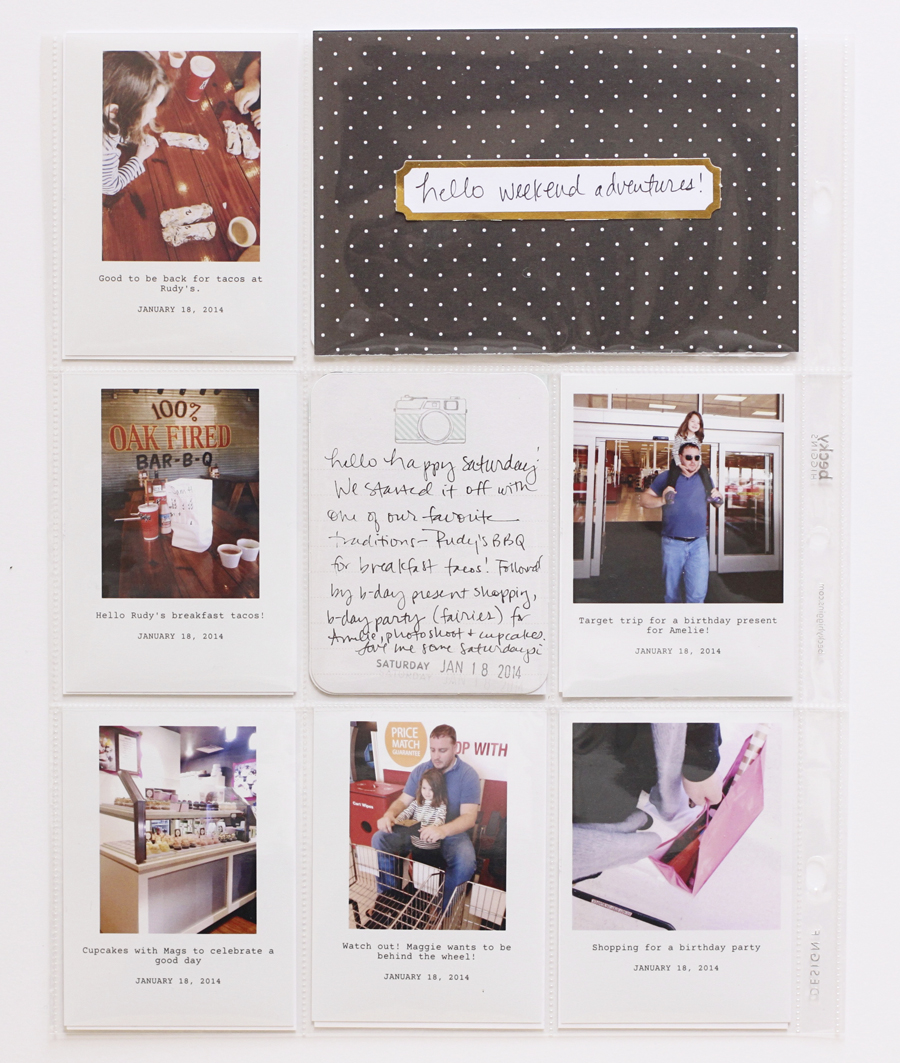
But back to the main topic: my week 5! Here it is, the left side and right side. My title card, Maggie quote card and week in review card. Lots of little moments I probably would not capture anywhere except here.


And here's the small insert this week. I used a gold sharpie paint pen for the journaling. And if you look at the photo of my above, you may notice the round frame. I did that in an app that does round frames. I think it was A Beautiful Mess app, but there are others. I'll have to do a post about that. It was actually really simple and I kinda love how it turned out!


And by the way, we love Hat Creek Burger Company in Georgetown. So so good and they have a cool play area in the back. Really fun.

And that's it! Hope to be back with February soon. Take care! Let me know if you have any questions!

_________________________________________________________________________________

Project Life® is a simple approach to scrapbooking developed by Becky Higgins. For more information click here.

In January 2013, I found an iPhone app called Collect and began using it for my Project Life. To watch a video introducing how to use it, click here. To watch my video on exporting the photos to print, click here.

To join me, along with Elise Blaha Cripe and Megan Anderson, for three weeks of Project Life inspiration in our class Project Life Lessons at Big Picture Classes, click here. Would love to have you join us and would love to help you develop an approach that works for you.


3.27.2014

Project Life® 2014 | Week 4

Hello week 4! Moving right along. This week just called for this awesome title card from Ali Edwards. It's a digital overlay that I created a card out of in Photoshop Elements, then printed and trimmed it at home. Then I added the gold label from Studio Calico and stamped the dates on it. To find Ali's overlay at Designer Digitals, click here. Did I mention I love how it turned out? Yes, totally love it.


This week was all about us getting sick, then getting better. Some cold weather here in Texas, and a bit of our everyday routines. Some weeks I just really like to focus on the everyday, especially after a week when there is a big event or something like that.

Here is the two page "spread" with the left and right side together. Again, just following the recipe of having a title card, Maggie quote card, Collect photo cards, week in review cards and a few filler and journaling cards. Simple, easy to get done and I love how it turns out.


Notes about the left side: the wonky purplish color is normal. Well, normal for her room. See those cute pink flowers on the wall? They are lights from Ikea and when they are on, it gives the room a pinkish glow that turns out to be a bit purple in the photo. I could just turn it black and white, but I kinda liked the crazy color. Just embrace life, right?


The Maggie quote card is an adaption of a Paislee Press card here, and the week in review template is from Tracy Larsen. You can find that here.


Again I used those vellum stickers from Studio Calico for the title on this journaling card. I love how they make the journaling card stand out and I love capturing a little thing like this. I often wonder if it will become a tradition, something that sticks…or will it be a fleeting thing that I will look back on and say, "oh wow! that's so cool we used to do tickle bugs!" Little things like that make me just love this hobby even more.


I don't include a lot about my work in my album. But I do want to include enough to remember this time and be an example to my girl. 


So there it is! Another week documented. Let me know if you have any questions!
___________________________________________________________________________

Project Life® is a simple approach to scrapbooking developed by Becky Higgins. For more information click here.

To join me, along with Elise Blaha Cripe and Megan Anderson, for three weeks of Project Life inspiration in our class Project Life Lessons at Big Picture Classes, click here. Would love to have you join us and would love to help you develop an approach that works for you.


3.26.2014

Project Life® 2014 | Week 3 | Insert Happy

I'll admit, this week I got a little carried away on the inserts so I thought they deserved their own post. Mostly the inserts this week were because I took a lot of photos. Birthday weeks + a Project Life Party tend to do that. I also took some photos with the big camera and wanted some 4x6 photos added in the album. 

So here we go. This is the first insert, simply a Design F page protector with the last column trimmed down. I trim just outside of that last seam so the seam stays intact. Another trick I've done with this is to trim a little further out and then use washi tape along it to help set it apart from the other pages. Here I just kept the trim closer because I have a bigger Design G behind it, and that one works really well to set it apart from the regular spread.

I used a title card from the Midnight Edition of Project Life for the title. Letter stickers are from a Studio Calico kit. You could also just use two Collect cards or two 3x4 cards attached to a white piece of cardstock (or even a piece of transparency) instead of a title if you like. I've tried both of those approaches when I have one side of a Design A that I'm using mainly Collect cards on. Just a thought if you get tired of trying to come up with big title cards.


Here is the back of that insert. Just used a pice of patterned paper trimmed to 4x6 and a gold label from Studio Calico for my title card. I spent one evening in the living room watching TV with my family and trimmed down a bunch of my 6x6 paper pads and other 12x12 papers to create a stash of 4x6 papers specifically for this reason. I really love filler cards and title cards. It just creates a bit of context and gives the eye a place to rest with everything else that can be going on.

And I love documenting the weekend adventures together. When my work weeks are really busy, I don't have much time to document during the week, so the weekends tend to be really photo heavy.


And of course I had to have a separate insert for our Project Life party! Was so thrilled to meet Molly Frances and get together with my friend Nicole to play at Archiver's before they closed. Still so very sad about that. I'm really happy she helped me organize it. I can be a bit of a hermit, and it was great to get out and be with friends who "get it" (my obsession with this!) Plus, I picked up a really cute hello stamp from Molly! Her stamps are great, by the way! And she introduced me to a great gold ink by ColorBox. I think this is the one here. It's a darker gold so it shows up better than others that I've used. Love learning new tips although my budget was pretty busted after the sales at Archivers :)


Again, I used a title card, this one from the Cut and Paste mini kit I think. Plus letter stickers. These are Thickers from Studio Calico. I think this approach is one I'll be using over and over. It really helps me use up my Thickers collection too.


And I love just a bit of handwriting on a card. Simple and easy. No worrying about typing it up, running it through a printer or even a typewriter. Just a pen and a card. The way the kits were originally designed to be. I adore anything of my parents or grandparents with their handwriting, so I try to be sure to add some of my own in the album.


I seemed to have taken a lot of photos of my stamps and projects this week, so I decided to include them! Documenting real life, including our obsessions! This title card is from the Sunshine kit. My friend in Hong Kong sent me some in exchange for some from the 5th and Frolic edition. That's something to keep in mind--you can always share your kits with friends as they do come with quite a few multiples.


Here is a Design G page protector--it included pockets for 3x4, 6x4 and 4x6. So I can include my vertical portrait type photos from my big camera here. If I only have a few, then adding some filler cards and even the confetti pocket help fill out the pockets. Thinking I might go back and add in more context to this insert with journaling about why she was dressed up, but I did add a photo of her with her face painted on my regular spread with information about being dressed up for a birthday party. Mainly here I just wanted to include these cute photos.

The hello card is from Studio Calico's Printshop collection (one of my faves) and the cute filler card is from a We R Memory Keepers Albums Made Easy card pack that I had picked up at Target.

Here's an example where I used a transparency sheet--I simply cut the cards in half and adhered them to the transparencies I had cut to fit the 3x4 pockets. I like how they are kind of floating and then there are more see-through elements in the album.


So there it is! My Insert Happy week 3. I'm not feeling so bad about not taking as many photos in March now! :) 

Again, if you have any questions just let me know!

Project Life® is a simple approach to scrapbooking developed by Becky Higgins. For more information click here.

To join me, along with Elise Blaha Cripe and Megan Anderson, for three weeks of Project Life inspiration in our class Project Life Lessons at Big Picture Classes, click here. Would love to have you join us and would love to help you develop an approach that works for you.


3.25.2014

Project Life® 2014 | Week 3

I had big plans for this month. Really, I did! Those plans included finishing up and posting lots of my Project Life® layouts. But like Dan says in the movie Dan in Real Life, "Plan to be surprised."

So it's been a bit different than I planned. But in the end it's good. Still here, but making some changes to make our living situation better. I'll talk more about that later. Just know I'm in the midst of moving my scrap space from the bedroom to a little nook area (thank you to my husband for letting me take over his office and helping me move.) 

(*updated--see at the bottom I found out how to fix it!) And a little disclaimer about these images. They look much better on my computer. For some reason, when I upload them here they are losing a ton of quality. It's really the first time I noticed it this bad. So, like many of the changes I'm making, sometimes something happens to make you boot into action. This might be what makes me change up the blog. Who knows, maybe it will be better in the end? I like to think so at least.

So, rambling aside, here are my pages from January--week 3. Very insert heavy, so I'll be doing another post about inserts. Also, I somehow missed photographing one, so I'll be reshooting that today.

My goal is to blog some of my layouts and then end with a giveaway to my upcoming class, Project Life Lessons. Really hope I can make that happen!

So week 3 included my husband's birthday, my daughter going to a Tinkerbell party, dressing up for 100 days of school, some silliness, and playing in her room. 


I'm using the Collect Photo App for all of the 3x4 photo cards with journaling that you see. I add the photo and the journaling right on my phone, and print them with Persnickety Prints. You can watch my video tutorial showing you how to do that here. Also have an intro video that shows how to use the app here. You can find out more about Project Life® here.

Here is the left hand side of the spread. Here I have my title card, Maggie quote card and the Collect cards. 


I went a little insert happy this week, so I'll be sharing those in my next post :)


This is the right hand side of the normal spread. Here I have my week in review card from Tracy Larsen and more Collect photos. The inserts are sandwiched between the left and right side pages.


If you have any questions about the products, just let me know! Using mostly Paislee Press cards, Midnight edition, anything Dear Lizzy and a Jade card here. Also used those awesome vellum letter stickers from a Studio Calico kit.

Take care and hope to be back soon!

updated: I found out what was going on with the photos! Deb Duty posted on the Studio Calico boards that blogger is enhancing the photos. Simple fix: go to your Google+ account and change the setting to not enhance them. Really frustrated by that, but at least there is a fix. Click here for Deb's very good instructions.

3.03.2014

Project Life Update | January Part 1

Hello again!

If you've stayed with me this long, I thank you! If you are just joining me, hello to you as well! Happy you are here and happy to be sharing my Project Life pages for January. Specifically, my January introduction page and weeks 1 and 2.

Yes, I realize this is March! Life's been busy and my mantra with this blog and Project Life or any memory keeping projects is simple…live life first. So, while I may get pages completed (and let's face it--that's a huge accomplishment for me); I don't always get them photographed and blogged. But I digress.

So, here we go. First up is my January introduction page. I basically do these because 1. I love them. 2. I love the calendars and the monthly review. 3. It helps give context and organization to my album. 4. The right hand side gives me a place for a longer story/personality page/fave photos roundup, as found in our eBook, Project Dig Deep. And finally, the biggest reason is number 5. Because when I get behind with the "weekly" approach, I can always just forget the week in review and do them by month. My back-up plan so to speak. Anyways, I love it.


Title page is a free download from Persnickety Prints found here. January month in review card and weekly review cards are from Tracy Larsen, found here. (I think she is working on a 4x6 version--I just tweaked mine to 4x6 in Photoshop Elements.) Quote card is from the teen theme pack, I think, from Becky Higgins Project Life® found here. Calendar from Paislee Press found here.

And on to week 1. Here is where I use the majority of the Collect Photo App cards. For more information and a tutorial, see my prior post here.

I have a title card, a quote from my daughter and a week in review card each week. I love having a design plan, a place for these cards to go. It takes the decision making and agonizing over what goes in what pocket so much simpler. Yes, if you do Project Life as originally designed, this is done for you. But even then, there were too many decisions for me. I've gotten faster, but I cannot tell you how much I love having some pages pre-planned. Because I'm ordering out my photos and it can take a month before I get enough to send out, I really like having a plan for where these go.

Here is the main "spread" for week 1. (spread meaning left side + right side). This was January 1-5. Welcoming the new year, enjoying New Year's Day and the weekend together. Pretty much a magical start to the year.


I decided to add a "Maggie Quote" each week instead of a different quote card. She's saying so many funny things now, I just want a way to remember some of them. I'm using a Paislee Press card that I tweaked to make it work. Find that here.


And on to week 2: January 6-12. Decided to clean up my bedroom/scraproom. It's a bit overwhelming and only somewhat better, but at least it helped get me going for the year. I changed up some of my table for a cleaner look. Goodbye avocado green, hello mint green thanks to cute boxes from Ikea.


And I had to include a little extra bit about Torchy's Tacos. Seriously yummy and "damn good" as they call them. Maggie loves that "baby Jack Jack wears a diaper." (she's a bit of an Incredibles fan)


As for products, I'm using a kit I pulled together from my physical and digital stash. Lots of Paislee Press papers I made into title cards, cards from Midnight and Seafoam, cards from Dear Lizzy kits. Basically neutrals with pops of mint and pinks/corals. I'm calling it the Mint kit. Totally nothing official, just having fun with it and my goal is to use my stash more this year. I'm also still subscribing to the Studio Calico Project Life kit. That cute "Love This" card is from their January kit, Copper Mountain.

If you have any questions for me, just ask below. Am happy to help!


Also, I am thrilled that Big Picture Classes is running our class Project Life Lessons again! I teach it along with Megan Anderson and Elise Blaha Cripe. Both of these ladies are completely amazing and I'm honored to be teaching with them. 

About the class: it's three weeks long and we each share our processes, tips and tricks, along with ideas for improving your Project Life® processes in each of these main categories: photos, journaling and creating Project Life® layouts. It's fun, we have videos and downloads for each week (handouts for content + free cards you can use in your album.) There is also a Pre-Class, which is available immediately upon purchase of the class. It's packed. Seriously packed. I've taken lots of classes so I know! :) 

The awesome thing is that there is an early bird discount available until March 12th. (price will go up from the discounted $30 rate to the regular $45 rate the morning of March 13th.) So really, grab it before then!! You could buy a mini kit with the savings! :)

Class begins April 17th and I hope to see you there! 

To find out more info and to sign up, click here.


 Links provided may include affiliate links where possible.